Setting the Sails
SETTING THE SAILS
At least one Senior or two Assistant Millers together with another person must be on site whenever the sails are set.
The climber must ensure their own safety. Suitable footwear should be worn. Gloves, hard hat and ropes are available.
The common sails should always be set before the shuttered sails, as there is less sail area to turn the sails in a sudden gust of wind when climbing them, than if the spring-shuttered sails were set first.

If the wind is very strong, it is better to turn the mill out of the wind beforehand.
SETTING THE COMMON SAILS
- A sweep must be brought round manually into a vertical position and the brake applied. The brake man should shout “BRAKE ON” once the brake has been set. The climber should confirm they have heard this by responding.
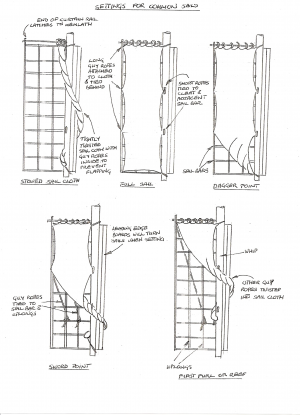
- The sailcloth is untied and unfurled from around the leading edge of the sail.
- One person should hold the bottom of the sailcloth while the climber is aloft to prevent a sudden gust flapping the cloth and endangering the climber. NB. In windy conditions a sudden gust of wind can sometimes turn the sails, even with the brake on. A separate person should always hold the sail while the climber is aloft to tie the ropes.
- The short pairs of ropes on the right hand side of the sail cloth are secured to the two cleats on the whip NB. Each rope should first go round the adjacent sail bar, to prevent the sail becoming unfastened in any back wind. To minimise the risk of falling when securing the ropes to the cleats, the climber should use the sail as a ladder. The sail should be ascended adjacent to the whip, with one leg hooked over the sail bar above for safety, thus freeing both hands to tie the ropes.
- Once the climber has secured the sail to the cleats and is back on the ground, the sailcloth can be spread by pulling the top guy rope sideways away from the stock.
- The three guy ropes are made taught and secured around a sail bar and hemlath at the back of the sail frame using an approved knot.
- The sailcloth is pulled down tightly round the bottom of the sweep and tied securely at the bottom corners of the sail frame and whip. Should the wind be very strong, one or both sails can be reefed to one or other trailing edge rope positions, the reefed part of the sail being twisted anticlockwise and tied to a sail-bar. NB By twisting the sail anti-clockwise, the rolled part of the sail will be behind and present a flatter air surface to the wind. This gives four sail configurations, namely :- First furl or reef, Sword point, Dagger point and Full sail.
TO “UNSET” THE SAILS
these procedures are reversed :-
The common sails must be “Unset” after the spring shutter sails.
- Each sweep must be brought round manually into a vertical position and the brake applied
- When the sail-cloths are stowed, the three trailing edge ropes are folded into the sail-cloth, which is tightly twisted and threaded round the whip and through the sail (to prevent flapping), the end ropes being secured to a low sail-bar and bottom of the whip.
SETTING THE SPRING SHUTTER SAILS
The spring shutter sails must be set after the common sails.
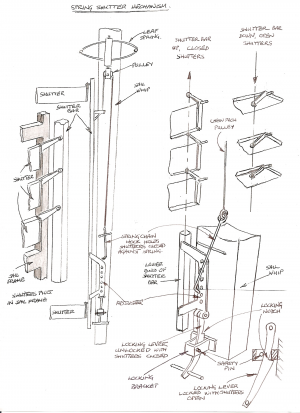
These sails resemble the slats of a Venetian blind. The shutters are held closed against the action of a leaf-spring situated at the top of the sail. Should the wind become too strong, the pressure on the boards overcomes the spring pressure, allowing the boards to open and spill the wind. The spring pressure can be varied for different wind conditions, by re-positioning the spring chain hook into one of the holes in the adjuster.

A separate locking lever at the bottom of the sail will also allow the boards to be locked in the open condition and will not close should the mill be tail-winded. The boards should be locked open at all times when the mill is not in use.
When setting the sail, the lever is pulled forward into the unlocked position and the boards held closed using the spring chain hook.
The spring chain hook should always be engaged in a hole on the adjuster whether the sails are in use or not.
- A sweep must be brought round manually into a vertical position and the brake applied.
- Remove the safety pin from the locking lever bracket which holds the locking lever in place.
- Release the spring chain hook from the adjuster.
- Pull out the locking lever to release the tension on the leaf spring and free the shutters from their “locked open” position. (NB. Take care to hold the cross bar by its ends to prevent trapping fingers as the spring loses tension. )
- Replace the safety pin into the bracket.
- The spring can now be re-tensioned to hold the shutters closed, by placing the hook on the spring chain into one of the adjuster holes. Spring tension can be increased using a lower hole, so that the shutters open in a higher wind or vice versa.
TO “UNSET” THE SPRING SHUTTER SAILS
these procedures are reversed :-
The spring shutter sails must be “Unset” before the common sails.
- A sweep must be brought round manually into a vertical position and the brake applied.
- Remove the safety pin from the tension lever bracket.
- Release the spring chain hook from the adjuster hole.
- Pull down the locking lever (attached to the shutter bar) and latch a notch on the locking lever onto the locking lever bracket.
- Replace the safety pin in the bracket so that the locking lever cannot become dislodged, leaving the sails safely secured with the shutters locked open to allow the wind to blow through them.
- Safely stow the chain hook by and pulling it down (against the spring tension) into a hole in the adjuster.
.
Previous: Operation of the Brake Next: Sails Only Turning